
As I began to design The Cottage, I knew I wanted to stencil the floor. I've been stenciling as long as I can remember. I have done fabric, furniture, signs and always wanted to do a floor.
This floor was the perfect size. At just 11'x14' it was a great project to tackle without feeling overwhelmed. The room is a perfect rectangle.
I did a little research on Pinterest for the "How to" to get a basic idea of what I needed. I knew that if it didn't turn out great, I could just paint over it.


Supplies:
~Floor and Paint from Benjamin Moore. I used the premixed white for the base coats. Low Sheen.1 gallon
~Floor paint in 1642- Cape Blue from Benjamin Moore. Low Sheen. I quart.
~4" foam roller, 1 9" paint roller with 2 general purpose roller heads and long handle, paint tray. 2" paint brush.
~Blue Painters tape, 1 roll, 1"
~Tape Measure.
~Rag, drop cloth and brown paper bag.
~Pencil
~Stirring stick.
~Cotton string long enough to reach across the room.
~16'x16' Santa Ana Tile Floor Stencil from Cutting Edge Stencil.

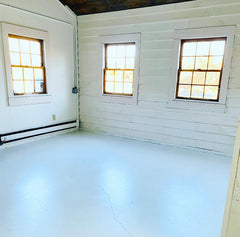
I prepped the concrete floor by sweeping, vacuuming and washing with swifter.
You want to make sure your surface is clean. Best if painting above 60 degrees for even painting and drying. I cut in the whole boarder about 2" with a paint brush first. The roller won't reach all the way to the wall. Pour shaken white paint to half way fill the painting tray. Wet the roller with white paint a couple times to saturate the paint roller. Work furthest away toward you so that you don't step on the wet paint. Roll evenly over the entire floor... Let dry 4-5 hours. You will need to walk over floor to apply the second coat, so I has to be really dry. Apply second coat. This paint has really good coverage, so two coats were enough, but do another is you can still see the original floor.
VERY IMPORTANT: after you do the base coats, the floor needs to cure for at least 3 days. This step is really important. You don't want all you hard work to peel or chip.


After the floor base coats have cured for a few days, it's now time to stencil !!
Find the center of the room. It makes things turn out even if you start in the middle and work out. I measure the exact center and marked it with a pencil mark. I also found the center of each wall. Attach the cotton string at the center of opposite walls with blue tape. and string across the create a straight line to guide you when painting the first row.
Lay the stencil in the center and use blue tape to secure the stencil so it wont move when you roll the pattern. Use the 4" foam roller with the color of your choice. Mine was Cape Blue. Use another paint tray to pour blue paint and roll paint to saturate roller. Use the brown bag to roll off excess paint. Roll from center out, using medium pressure. It's best to do a couple light passes than a heavy one that could bleed through. Work your way out, lining up the stencil. There are guidelines to help you do that. Keep working and staying straight as you go.
This goes pretty fast. The stencil is large and works up fast. Use you rag to wipe any bleeds or mistakes along the way.
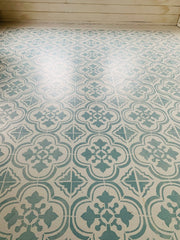

I left a 12" boarder all the way around. It looks like a rug and it's spaced perfectly. If you have to go all the way to the wall. this takes more time and patients. It was recommended on You Tube that you purchase two stencils so one can be cut smaller to do the tight spots !!
Again, this needs to cure for up to a week. They do sell a sealer to roll on to extend the life of the floor, but I did not. I'm going to let it wear naturally and plan to do another design as the seasons change.
Hope this is helpful. I LOVE the results. It is budget friendly and packs a punch in the overall design. Give it a try yourself !!